Sharing : Basic Configuration Palo Alto Feature (Bahasa)

logo-green

Basic Configuration Common Feature Firewall on Palo Alto

Hello, with me again…LuL 😛

Today i wanna share to you about one of  famous Next Generation enterprise firewall, right now he is leader on the gartner for Enterprise Firewall categories, yes like you see at the picture above, thats name is Palo Alto Firewall. but the question is? what make that’s firewall different from other firewall.

They have Special technology architecture owned by palo alto “Single pass parallel processing (SP3)” which differentiates from its competitors is enabled firewall to work on high throughput and low latency even while incorporating unprecedented features and technology. Next Generation Firewall technology palo alto used 3 main key for visibility and control : App-ID,User-ID and Content-ID, App-ID used to determine the exact identity of applications regardless of port, IP address and protocol, User-ID used to identification username access with integration to active directory (AD) to See who is using the applications on your network, set policy based on users, Perform forensic analysis and generate reports on user activities, the last is identification of advanced threat through Content-ID based single-pass architecture, which is a unique combination of software and hardware that was designed from the ground up to integrate multiple threat prevention technologies (IPS, anti-malware, Command and Control, URL filtering, file and data filtering). The user and application visibility and control of App-ID and User -ID, coupled with the content inspection enabled by Content-ID, empowers IT teams to regain control over application traffic and related content, integrated with WildFire threat intelligence cloud for advanced analysis and prevention engine for highly evasive zero-day exploits and malware.

for your information,  iam not try to impress you and make you buy this firewall to your enterprise, my pupose create this article is to help you, if you have this firewall on your environment infrastructure and how to configure some basic feature palo alto firewall

i get that information from their website, and my experience , but i believe, security its not just about your firewall capability, its about policy, structure, procedure, aware, standards, and many more aspect you must  see when you design a security system

on this article i create a guide book on PDF,  this book is basic guide how to configure common feature  firewall used appliance palo alto , i used Virtual edition PAN OS 7.1.0

you can download image “PA-VM-ESX-7.0.1-u1.ova”   from link below

create free account and download that image

https://mega.nz/#!hFs3CY6S!aMuvQCNQpZ3G2mm8GEYXaOdxvOrjGlp13MBeTD_rI88

Iam really sorry this guide i created used bahasa, but i think people from another country will understand from name of menu and from the picture.

hope you enjoy it 🙂


ELK/Elastic Stack (Powerfull data analytic engine, and Visualization )

eco-logo-bd924bc09d97ac4372a3db189c8f8486

Hi All,

Today i wanna write about one of platform  data analytic engine (elasticsearch) to analysis data and information from dynamic data collection (logstash), then we can visualize and present  that data to the graph and chart (kibana), we can called “ELK stack” and now the name become “Elastic Stack”, why stack?? because its combination three application platform to process a log information into  visualize data (my opinion)

The question is,  how we can process that data to the important information  and present that data to our company,client or customer in the graphic chart through Elastick Stack?

we can send data and information from system or application to ELK system in syslog streaming, then logstash will collect the log information, filter and parsing that log, and give the output to elasticsearch, in the elasticsearch we can analytic that information, filter the most important data that we need through query used elasticsearch engine and present that filter query to  readable data used Kibana on graphic chart form as information data we can present to our user

Now lets action to create Elastic Stack System

we will instal Elastic + Logstash + Kibana on ubuntu system 14.04 LTS

spec minimum requirement to running ELK my recomendation is :

RAM : 8 GB

CPU : 2 Core

Disk : 40 GB

first we need update the ubuntu repository with comamnd

#sudo apt-get update

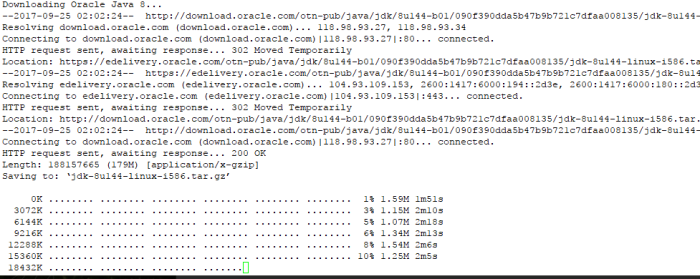
then we will installed Java 8, because Elastic Stack and logstash used java platform

======================================================================================
Install Java version 8
=====================================================================================

a. add oracle PPA repository to ubuntu system

#sudo add-apt-repository -y ppa:webupd8team/java

b. do update package

#apt-get update

c. install java 8 with command

#sudo apt-get -y install oracle-java8-installer


Install Java 8 Output

d. check java instalation with

#sudo java -version

Java 8 instalation check

=======================================================================================
Intsall Elasticsearch
===============================================================================================
a. Import public GPG key into apt repository

#wget -qO – https://artifacts.elastic.co/GPG-KEY-elasticsearch | sudo apt-key add –

b. Then, you will need to add Elastic’s package source list to apt. (elastic version 5)

#echo “deb https://artifacts.elastic.co/packages/5.x/apt stable main” | sudo tee -a /etc/apt/sources.list.d/elastic-5.x.list

you can check aptitude source list on yur system in /etc/apt/sources.list.d/

c. update repository on your system with command

#sudo apt-get update

v5 success elastic

d. install elasticsearch with command

#sudo apt-get install elasticsearch

Install elasticsearch

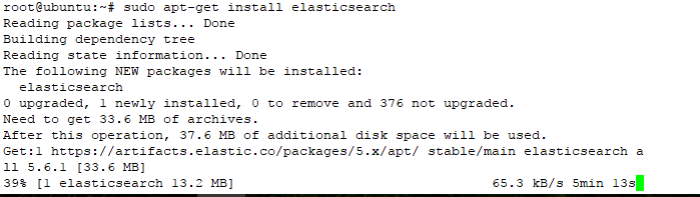
Note : if you refer another source tutorial and they try to install elastic version 2, its not valid anymore, i try used elastic package version 2 , and the result is “unable to locate package elasticsearch”, like on the picuture below

Failde version 2 elastic

Failed Install elastic

e. Next you will  restrict outside access to your Elasticsearch instance (port 9200), so outsiders can’t read your data or shutdown your Elasticsearch  through the HTTP API.
Find the line that specifies “network.host“, uncomment it, and replace its value with “localhost” so it looks like this:

Let’s edit the configuration on directory /etc/elasticsearch/elasticsearch.yml

#vim /etc/elasticsearch/elasticsearch.yml

uncoment line below and change that value to

network.host: localhost

save file config elasticsearch

Elastic Config

and start elasticsearch service with command

#sudo service elasticsearch start

check status service elasticsearch with comamnd

#sudo service elasticsearch status

f. Next, if we want to start elastic on boot startup used command

#sudo update-rc.d elasticsearch defaults

the output should be like on the picture below

Autostart elasticsearch

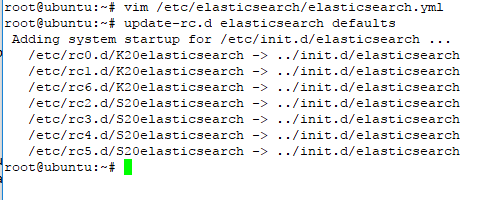
with this command ubuntu system  will be refered directory /etc/init.d/elasticsearch and start all component elasticsearch on the next boot

g. You can test local elasticsearch running with the following curl command:

#curl localhost:9200

the output should be like on the picture below

test accesss local elastic

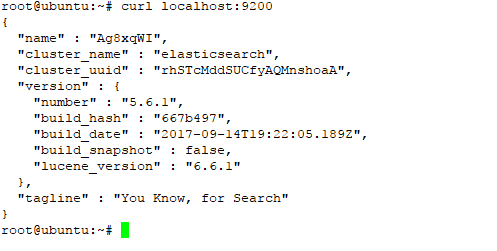
at this step we have success install elasticsearch on ubuntu system

===========================================================================
installing Logstash
===========================================================================

in this step we will install logstash as collection dynamic data and information through streaming syslog, create type input data (ex: UDP: 514) format type data (JSON or syslog), filtering data  and give the output to the elasticsearch

a. to install logstash first add repository logstash to aptitude debian package

#echo ‘deb http://packages.elastic.co/logstash/2.2/debian stable main’ | sudo tee /etc/apt/sources.list.d/logstash-2.2.x.list

b. do update on repository

#sudo apt-get update

Install logstash

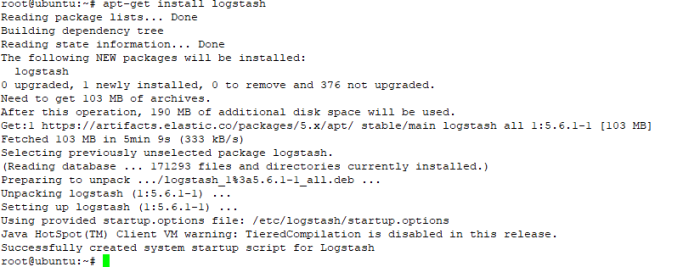
c. install logstash with command

#sudo apt-get install logstash

Install logstash again

d.After installed logstash dont start that service, we must create logstash configuration first to parsing log they get from remote device about input log setting (port, protocol),format log (syslog,JSON), filter, and output where the output log will be showed, in directory configuration logstash /etc/logstash/conf.d

im split the configuration to three file there is input config , filter config, and output log config

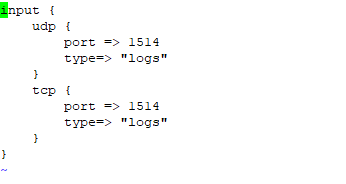
first, create configuration input log  setting, such port service will be used and the type of log streaming.

create configuration with command

#vim /etc/logstash/conf.d/input-rsyslog.conf

and add the line below to the file configuration

===========================
input-rsyslog.conf
=========================
input {
udp {
port => 1514
type=> “logs”
}
tcp {
port => 1514
type=> “logs”
}
}
================================

example picture :

input-syslog conf

second, we will filter log data and make that data to the field information

create configuration file with command

#vim /etc/logstash/conf.d/syslog-filter.conf

add the line on the below to file configuration

===================================
syslog-filter.conf
=====================================
filter {
if [type] == “syslog” {
grok {
match => { “message” => “%{SYSLOGTIMESTAMP:syslog_timestamp} %{SYSLOGHOST:syslog_hostname} %{DATA:syslog_program}(?:[%{POSINT:syslog_pid}])?: %{GREEDYDATA:syslog_message}” }
add_field => [ “received_at”, “%{@timestamp}” ]
add_field => [ “received_from”, “%{host}” ]
}
syslog_pri { }
date {
match => [ “syslog_timestamp”, “MMM d HH:mm:ss”, “MMM dd HH:mm:ss” ]
}
}
}

=================================================================================

the last step, we will create file configuration to put the output log data on elasticsearch

create file configuration with command

#vim /etc/logstash/conf.d/output-syslog.conf

and add the line below to the configuration file

======================================================================
output-syslog.conf
=============================================================
output {
elasticsearch {
hosts => [“localhost:9200”]
}
stdout { codec => rubydebug }
}
=================================================================

this is the most important configuration part when you wanna parsing and filter data from collection data machine and generate log data to be important information you will need to analyze your system, application, security alert, or network device

Logstash config
and this is an example logstash configuration for noob  to parsing log data, 😛

e. if you have create logstash configuration, you can test that configuration with command

#sudo -u logstash /usr/share/logstash/bin/logstash –path.settings /etc/logstash -t

Test config logstash

the result must be “OK” if  the result is not like on the picture there something wrong with your logstash configuration

if you used “sudo service logstash configtest” to test configuration logstash

u will get message error because that command not available on this logstash version

test config logstash failed

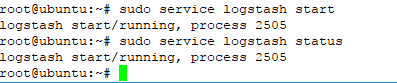
f. start logstash with command
#service logstash start

check logstash status with command

#sudo service logstash status

Logstash start

g. check input service port listening  logstash used to collect log streaming from remote device/system/application

on the configuration logstash input, we have defined port service input will be used UDP 1514 and TCP 1514 to collect log data from remote device

check port service to ensure your logstash machine is ready to collect data with command

#netstat -na | grep 1514
#netstat -an | grep udp

listener check logstash

h. for start logstash service on bootup startup ,used command

#sudo initctl start logstash

if you used command below

update-rc.d elasticsearch defaults” its not valid anymore

This is because in new version Logstash automatically detects the startup system of the system in use and deploys the correct startup scripts.

=============================================
install kibana
===========================================

we used kibana to visualize result query log information used elasticsearch from log data collection logstash to present that information to readable graph, chart, count, and pie

a. to install kibana firt we must  add kibana repository to your ubuntu with command
#sudo echo “deb http://packages.elastic.co/kibana/4.4/debian stable main” | sudo tee -a /etc/apt/sources.list.d/kibana-4.4.x.list

b. do update with command
#sudo apt-get update

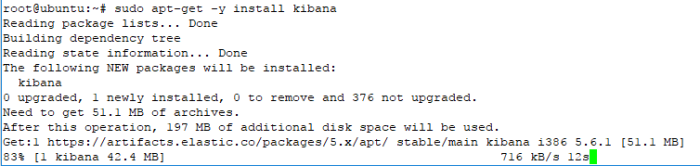
c. install kibana with command
#sudo apt-get -y install kibana

Install kibana

d. after success installed edit konfig kibana yml with command
#sudo vim /etc/kibana/kibana.yml

change the specific line to the value like on the below

server.port: 5601
server.host: localhost

Konfig kibana


starts kibana with command
#service kibana start

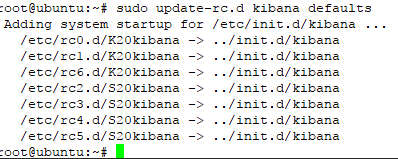
and for configuration start service on  boot startup , used this command

#sudo update-rc.d kibana defaults

kibana autostart

in this step, you have success intalled and configure three main component Elastic Stack (elasticsearch, logstash, and Kibana)

=========================================================
install nginx
====================================================
if we follow the instruction on the above and success, actualy right now we can direct access to eLK through port 5601 kibana, but on this case wee need proxy to masking port service ELK web admin and create login authoriztion username and pasword admin if we want to access ELK web config, so we need NGINX proxy to mapping port and install apache2-utils to create admin cridential login

install Nginx with command

#sudo apt-get install nginx

You will also need to install apache2-utils for htpasswd utility:

#sudo apt-get install apache2-utils

Now, Create admin user to access Kibana web interface using htpasswd utility:

#sudo htpasswd -c /etc/nginx/htpasswd.users admin

Enter password as you wish, you will need this password to access Kibana web interface.

Next, open Nginx default configuration file:

used this comamnd to configure nginx

#sudo vim /etc/nginx/sites-available/default
Delete  or comment the all lines and add the following lines:

=================================================
server {
listen 80;
server_name 192.168.1.7;
auth_basic “Restricted Access”;
auth_basic_user_file /etc/nginx/htpasswd.users;
location / {
proxy_pass http://localhost:5601;
proxy_http_version 1.1;
proxy_set_header Upgrade $http_upgrade;
proxy_set_header Connection ‘upgrade’;
proxy_set_header Host $host;
proxy_cache_bypass $http_upgrade;
}
}
============================================================
restart nginx and the result must be OK

finaly we can access Elastic Stack through ip server http://<ip server>

fill credential username and password to access Elastic Stack, if success we will se first window after installation Elastic Stack like on the picture below

Kibana Web

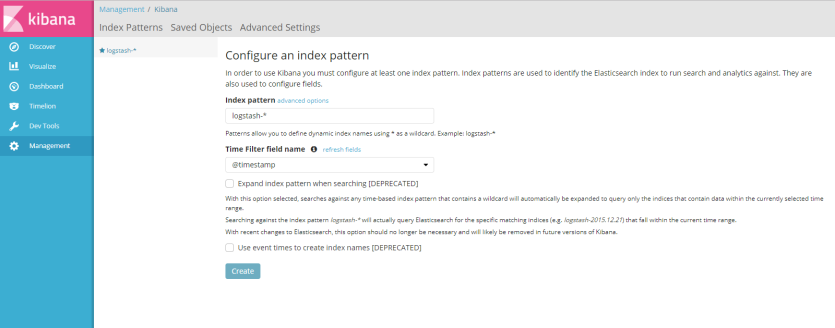
like information said ont the picture above, to used kibana we must configure at least one index patern are used to identify the elasticsearch to run search and analytics againts, and to configure index patern we need sample log file or syslog streaming to Elastic Stack, if you dont have example log data you cant create index pattern

in this example i sent syslog message from my virtual BIG-IP to ELK server, configure BIG-IP to sent syslog message to IP address of Elestic Stack used port 1514 and i success create index patern for Elastic Stack with click button “create”

after create index pattern we will see all syslog message from virtual BIG-IP  on menu “discover”Discover log KIbana

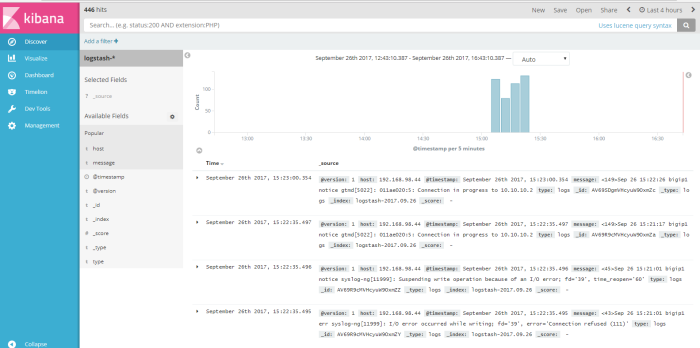
this menu is output data shown from logstash dynamic collection data, from this menu we can do a query search to log data to get information we need to analyze our system or application, we can filter the query search from available field to find a specific information, for example i wanna do a simple query from log data about how many log message send from host 192.168.98.44, so i “add filter” used field “host” logic filter “is” and the value a field host is “192.168.98.44” like on the picture below

save filter kibana

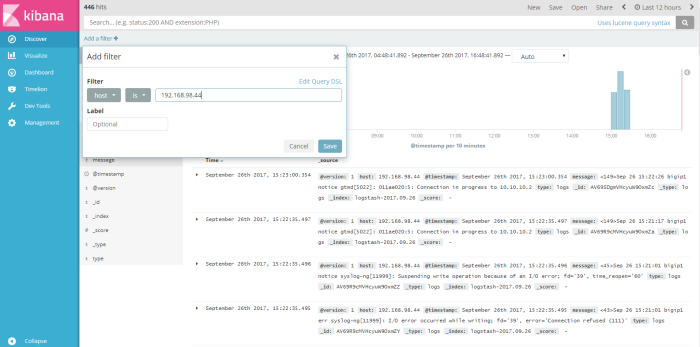
click “save” to save the filter, and the result of our filter will be shown on the picture below

filter kibana 2

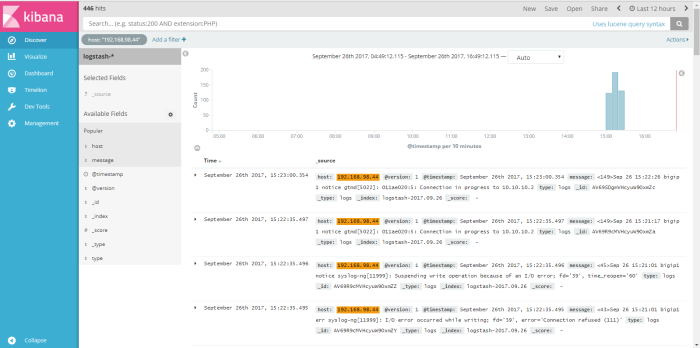
we can save the result filter to a profile name, with click save button on the top right window  and then used that result filter into visual graph through menu “visualize”

on menu visualize we will create new profile like on the picture below

create new visualiz

click button “create new visualization” and choose type visualize will be used to visualize result query information

choose visualize tempalte

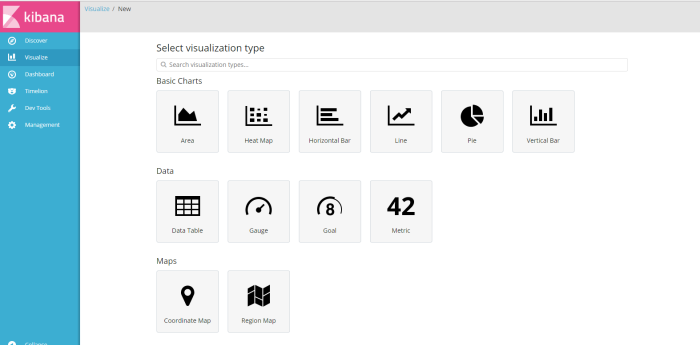
for this example i choose type “vertical bar” charts as visualize result from query filter log profile from menu discover i have created before named “host”, filter information  how many log message  from source host 192.168.98.44 ,

at the second example i will back to menu discover and create new filter to find message how many “connection in progress” we can get on syslog data, add filter and used  “message” as filtering field “is” as logical filter and the value of field message is “connection on progress” and the result shown like on the picture below

Connection in progress save

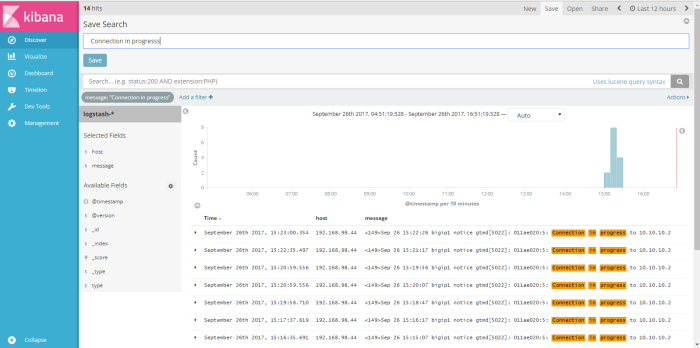
we can save that filter result as profile name, i save search filter with name “connection in porgress, next i will visualize my filter search through menu “visualize”


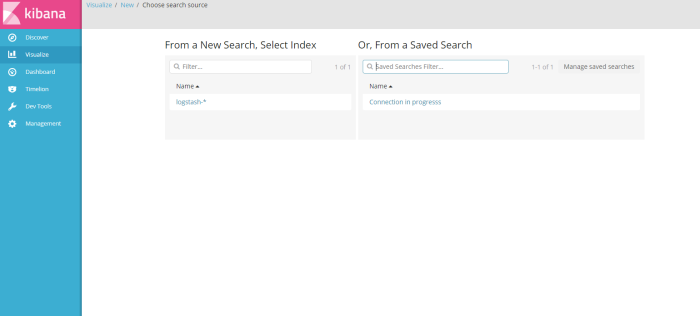
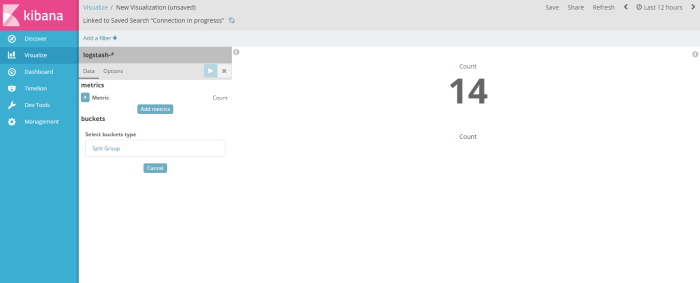
from menu visualize click “create new visualization” for the type of visualize i choose “count”, next i will choose data information source i will visualize, i choose result of search filter from menu discover i have created before “connection in progress” 

Choose from saved search

and the result shown like on the picture below

Save search 2

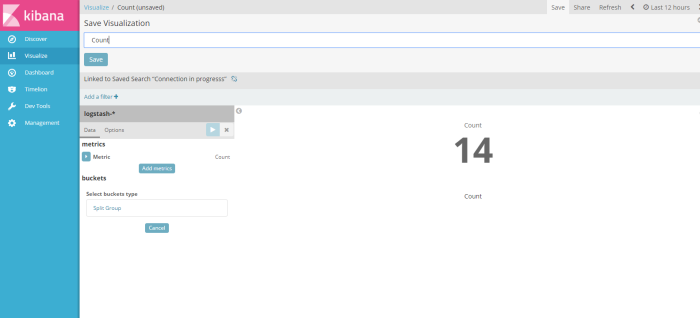
after visualize the result filter dont forget to save that visaulization template to be a profile, in this example i save the visualization profile with name “count”

save count

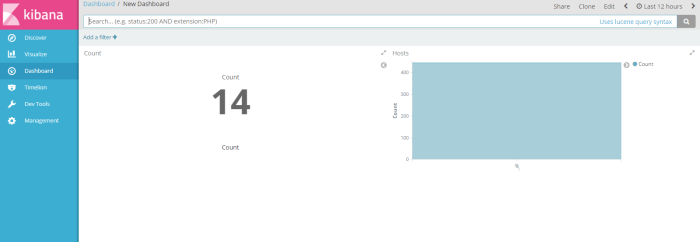
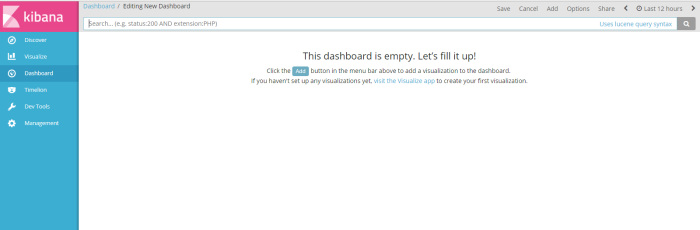
after visualize the result of filter information i will present all result filter search and chart to dashboard from menu “dashboard”

from menu dahsboard click add to create a dashboard profile

add to dashboardd

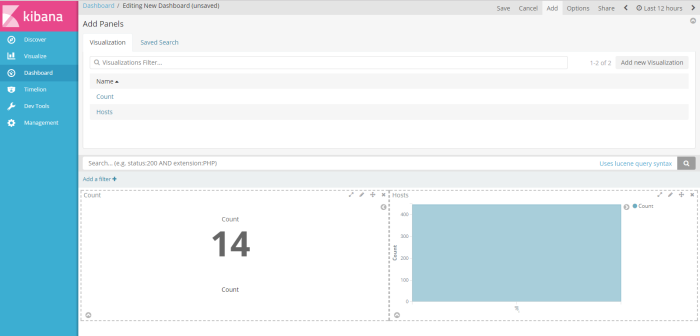
and the choose visualization profile have you crated to be shown on the dashboard, of course i choose 2 profile visualization i have created (host and Count) sample dashboard will be shown like on the picture below

add count and Hosts from virtualization filte

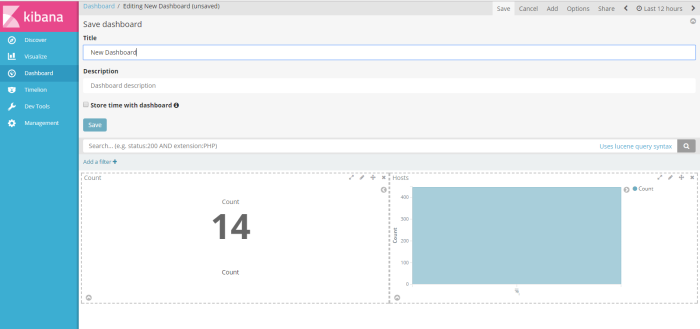
next, click save button on the right corner window to save the  profile as new dashboard profile, i save as “New Dashboard”

save as new dashboard

and then finnaly you have a new dashboard to infrom you, to your management or user about important information on your system status, security alert or application service alert, have you filter through query elasticsearch, from unstructure log data collected by logstash  into readable chart by kibana, Good Luck

New Dashboard


Ansible for Automation Network Infrastructure

Ansible_Logo

(on my third article, first i wanna to say sorry to you about my english grammar that so worst, i still learning my friend, but if i used Bahasa (im indonesian)  some people out there  will not understand)

On this article, i will explore one of famous open source Automation engine called Ansible, yes this tools is fenomenal enough on DevOps division, this tools can automate cloud provisioning like AWS, Configuration management for network device, application deployment, intra-service orchetration, and many others IT needs, that their website say. but on my experience as system asministrator that thing is damn right, but wait a minute, are these other tools like ansible can we used for autodeployment, orchrestation or something like ansible, sureee my friend, there is “Puppet”, and “chef”, dont worry live always have an option…lol,  back to the capability of ansible, for me as network geek i think i can used this simple engine for management configuration network device, and orchrestation maybe. if i have more than 10 network device on my infrastructure, or my growth company where i work  is so fast

on this article i wanna sharing to you how to install and basic configuration ansible to remoteand give basic instruction on one of network device example “vSRX Firewall” from juniper network. lets begin…

  1. Install the Ansible 
  2. we i will install ansible engine on my linux ubuntu 14.04, as information most of my article, i will do on my Virtual Machine Workstation. below is step to install ansible on linux ubuntu 14.04

a. first do update your linux ubuntu with command

$ sudo apt-get update

b. install your ubuntu software repository common with command

1

c. add repository ansible to your system with command

2

d. do update again after you add ansible repository to ubuntu

$ sudo apt-get update

e. install ansible engine with command

$ sudo apt-get install ansible

f. the last thing is check your ansible installation with comamnd

$ ansible –version

6

on this step you have successfull to install ansible on your ubuntu system…yeaayy,

i think that was easy right, oke lets we used this tools…

2.Know the structure

as you know if we have have install some application on ubuntu or other linux or unix system, better we now about their location directory system, ansible directory system  is on “/etc/ansible”, so we will to that directory and see structure directory that application

a. go to that directory

$cd /etc/ansible

b. see directory folder and structure withcomamnd

$ls -l (or $ll)

7

as we can see ansible have file “ansible.cfg” as default configuration ansible system, file “hosts” as configuration file to fill host/group list will managed by ansible system, and the last is folder “roles” as roles pupose in ansible

3. Configuration Ansible

a. first i will edit ansible file configuration “ansible.cfg” to add log file when ansible do some execution or work through their system, so when something wrong i will check the error from that log to get information what is wrong, open file ansible config with comamnd

$cd /etc/ansible

$vim ansible.cfg

and i will change value like on this picture below

LOg Setting ansible.cfg

remove the # to enable log path

b. Next i will  disable host SSH checking when ansible remote SSH to that host with uncomment this line on the picture below

SSH host checking

for information ansible used “Paramiko” is that phyton programming tools used by ansible managed remote host  used protocol SSHv2, and the most structure program ansible is used phyton programming, so for some cases we need library phyton if some execution playbook not working well, tell about paramiko, i have experience when i work as system administrator my boss is challenge us to create automation system used tools like ansible, puppet, or chef, but when i read about structure ansible and how they work used paramiko to remote system, i planned to create my own automation application used my little capability  phyton programming and knowledge about network configuration and bash programming in linux, but im too newbie and 😛 deployment is growing so fast, and i forget that task and not continue about my plan, but i have create some code on phyton programming used paramiko, and i will shared on next section in my article.

b. to execute job on ansible to the remote system we must have playbook folder, that folder will be used to create configuratio job file used YAML language to do many thing through ansible, like iam on this article to remote network device and do some basic action, so i will created folder playbook on directory ansible used user administrator with command

$sudo su

#mkdir playbooks

so on ansible folder i will have “ansible.cfg”, “hosts”, “roles”, and “plabooks”

4. create a Job on ansible

a. on this step we will add list host will managed by ansible with edit file “hosts” on directory ansible. i will add address SRX IP address to that file as host will be managed by ansible

$sudo su

#vim /etc/ansible/hosts

Hosts

on that picture i created list group host will be managed by ansible, the group si name [remote] and the host SRX i created alias name “host-1” to SRX IP address 192.168.98.49

save the file hosts

b. go to folder playbooks and create configuration file job to remote SRX juniper and do some action to that SRX

#cd playbooks

#vim juniper3.yaml

i create configuration job to remote network device SRX and i will show version JunOS through my ansible, so this picture is example of file configuration

12

i will explain line by line meaning of that configuration job used YAML language

name : name of job

hosts : it will caled list host from file “hosts” in this example i called specific “host-1” is that alias name SRX with IP 192.168.98.49 on the group [remote] like i was explain above

so when i write alias name on the config job “hosts” it will caled specific host that match alias name  from configuration file “hosts” if i write group name on hosts : remote it will caled all list host on that group.

gather_facts : yes this line to define we are will collecting information

connection: local this defines the connection will be made from this host

task: we  start to define the actual task that will run

name : name of task

junos_command : this is ansible module result integration ansible and juniper can we used to run command in Juniper OS

another module in juniper is

junos_get_config

junos_get_facts

junos_install_config

junos_zeroize

junos_install_os

junos_cli

junos_rollback

and many more

another integration module we can show on the picture below

Integration

Commands : command will execute on JunOS

host: is variable reffered to hosts function value on the top line (host-1)

Username : username login will be used to SRX

Password : password login will be used to  SRX

in the above for function username and password its not recommended in environment production, its not secure, theres another way to secure or masking this username or password but i dont do it on this case, u can find it by yourself. 😛

on juniper we will do some setting to allow ansible remote the JunOS, like a example picture below

set system services netconf ssh

this command will enable you to establish connections between a configuration management server and a device running Junos OS. A configuration management server, as the name implies, is used to configure the device running Junos OS remotely.

5. Execute that job

in this step we will execute job we have created on playbook folder to juniper SRX host with command

#cd /etc/ansible/playbooks

#ansible-playbook juniper3.yaml

at the first run i got much error, from YAML job i have been created like a used TAB on line, structure space, unknown function, or dependency not installed, but all error can you see on log execution ansible on directory path /var/log/ansible.log, this is reason you must enable on the file config ansible ansible.cfg that i was explain above. and one of crutial error i got is, one dependency ansible needed to create session netconf to juniper OS, log error i show on picture below

ncc not sinatlled

Ansible error : ncclient is not installed

that a module on phyton library can be used to create netconf session to juniper OS so when execution ansible shown message error “unnable to open shell” …T_T, so i will fix this error with installed that module to my phyton library, and in my opinion this is happend only to network device used netconf as connection, so i search how to install that module on ubuntu and i get from some github library open source developer to get ncclient installer, so i copy that file from github used git command and installed to the ubuntu system

downlaod ncclient

#git clone https://github.com/ncclient/ncclient.git&#8221;

login to ncclient directory and install file to the system
#cd ncclient/
#python setup.py install

and i got error egain because missing some dependency, :D, okay then im search forum why iam failed to install that ncclient and get comamnd how to fix it, il show on the picture below

9

i run that comamnd and installed ncclient is success!

on this section i wanna tell you little story, i feel that something weird when i used my brain to much, my face will be change to black, i dont know but my partner at work see what i see, my face is changed to black,..are some people get that experience too? please comment.

after success install that module to my system i try to execute my playbook again and gotcha, that playbook success execute to JunOS system,

Success YAML

success job will be show like on the picture above,

so just like that?? where the result of execution??

haha….im sorry i will do simple thing to show to you result of execution ansible playbook file juniper3.yaml to log file with command

#cd /etc/ansible/playbook

#ansible-playbook -vvv juniper3.yaml > /etc/ansible/playbook/version.log

and the result can you see on the log file like the picture below

ansible-playbook -vvv juniper3.yaml


actualy you can make result the execution to local file from playbook YAML, how? thats

you must explore later, and create another playbook to execute cisco device, or Arista, or F5, or linux system.  thanks for visit and read my article, i hope this article is helpfull…see you at next article


OSSIM AlienVault Basic Installation and Configure

av-logo-ossim-black

On this article i want to introduce you about one of Security Information and Event management  (SIEM) product called OSSIM (open source security information and management) from AlienVaults. This product providing one unified platform with many of the essential security capabilities you need like:

  • Asset Discovery
  • Vulnerability Assesment
  • Intrution detection
  • Behavior Monitoring
  • SIEM

this product very usefull to monitoring your system security, event, and vulnerability, especially this system can help you when audit assesment security like a PCI-DSS.

At the first step  we will download ISO file instalation to running that software on virtual machine, on this case i used Vmware Workstation version 11.0.

Download alienvault product software OSSIM on their website

https://www.alienvault.com/products/ossim

ss

After success download the ISO OSSIM software file next we will installed that software on VM workstation for testing puposes, i recommend minimum spec to install that OSSIM software on virtual machine for testing is like on the picture below, on production puposes you can calculated as your needed

0

Minimum requirement

RAM : 8GB

Processor : 4 Core

Hardisk 40GB


Power on the virtual machine guest and start the installation

  1. Choose “Install Alienvault OSSIM” to install OSSIM software to Virtual machine

1

2. Select Language to be used

2

3. Choose Your location (reference to your timezone), if location not found on list choose other

3

4. im choose regional Asia

4

5. Indonesia timezone

5

6. Country based setting

6

7. Configure Keyboard setting

7

8. Pre instalation check hardware

8

9. Configure IP address OSSIM

9

Configure netmask

10

gateway

11

Configure Domain name server

12

10. Configure Root Password System OSSIM

13

11. Configure  Clock (i refered to Indonesia because i choose regional indonesia on step above)

14

12. progress Installation System OSSIM (it will take a minute)

15

13.  After progress instalation OSSIM done you will shown main system logon

16

Login with cridential root system have you created before

14. After success login you must configure sensor OSSIM

17

15. Choose Configure Data Source plugin (to get data event or any information needed from host (caled Asset)

18

That plugin data source support many vendor (in this case for example  i choose Juniper SRX and F5)

19

Select data source with “space” and Press OK if we finish selected data source plugin

16. Back to previous menu, press (Back)

21

Choose “Apply all change” if we agreed with this setting, and then press “OK”

22

OSSIM will reconfigure the system setting like on the picture below

23

17. After reconfigure success we can login to web administrator OSSIM from browser, access web admin with address https://<IP address OSSIM>, and we at the first will show form to add administrator account like on the picture below

28

Fill the username, password and any cridential information, then click start using alianvault

18. Below is page  login administrator  to access web admin OSSIM, login with username and password  administrator

29

19. Next we will do basic configuration like on the picture below

30

If we verified that the IP address we used as management OSSIM is right please click Next

20.  Next OSSIM will do Auto Asset discovery on network segment, so if you want to used Auto Asset discovery to your all appliance or server, used segment IP address same with you Address management to your OSSIM system,  But dont worry we can do add host as asset in manually

31

22. Next step OSSIM will do deploy HIDS (Host Intrution Detection System) to asset detected by discovery, like on this picture

32

We can deploy on auto and manual, if we do auto deploy OSSIM will push agent to the system but we must have cridential admin to the host and ensure the connection is not blocking by firewall on network or firewall at the host, if not success we can try on the manual deploy

23. On the step Log management please just skip (or configure later)

24. On the step join OTX please “sign UP” ,fill your credential and after success you will get our OTX key, enter to that column OTX and click next, if OTX nof send to you, later you can check the OTX key on the website https://otx.alienvault.com/api/ after you sign in

33

click configures more data source like on this picture, and launch the main page web administrator OSSIM

34

25. If all the step above done, you will shown main menu OSSIM administrator management dashboard like on the picture below, and congrats you just finish installation step OSSIM

35

26. the one of most important thing at this step, we must add more host to monitoring as an asset in OSSIM system to know about their security portion and event information from  menu Environment –> Asset & Group like on this picture

36

Click “Add Asset –> Add Host” to add more asset

Fill the form asset, like OS and type device like on the picture below, On this case i try to add windows 10 PC workstation

Host

After we add the host as asset it will shown as a list on column asset, to easy manage we can add the assets to group, or create new group for the asset like on the picture below

37

In this example i have created group HostTest and i add the windows 10 PC to that group

38

and that host will shown as asset from group HostTest on menu Environment –> Asset Groups

Groups

In previous section we try to deploy HIDS on automatic to Asset with username and credential, if not success it will identified “not deployed/disconected” on column HIDS like on the picture below

HIDS

Now we will do deploy HIDS on manual configuration from menu Environment –> Detection –> HIDS –> Agent

HIDS2

Click “Add Agent” and search IP address asset will be deploy HIDS agent on the system like on this picture

Note: “ HIDS deployment is only available for assets with a Windows OS defined in the asset details pages”

39

Click the asset IP address and click save, then the Asset will shown in agent HIDS column, after asset was on the list then click icon “download preconfigure agent for windows” to download agent OSSIM to local drive and install that software to the host system manually

40

After success download agent AlientVault_OSSIM.exe install the agent to the system, open that agent app and check the log application the Agent is starting with PID, from application Agent menu View –> View Logs

41

After service agent start on asset/host system restart HIDS, from menu Environment –> Detection –> HIDS –> HIDS Control

42

and if agent HIDS is running properly on the asset HIDS status will bechange to “active” like on the picture below

43

From that HIDS agent we can monitoring Alarms, event, scanning vulnarebility from that asset like on the example picture below

44

Another feature on OSSIM you can explore yourself like an vulnarebility scan schedule to the asset

From menu Environment –> Vulnerability

45

Check Security events from the sensor in menu Analysis –> Security Events (SIEM) , and do filter security event from data source plugin, on this example i have plugin sensor F5

48

Example SRX Sensor Plugins

49

And many more feature you can used on OSSIM,  i cant explain whole feature on this artice,,..this article is long enough i think … 😀 you can explore by yourself, i still learning too, maybe some my statements wrong in this article, im so sorry and please correct me,.. Good Luck to you


How to Upgrade Software BIG-IP (from Version 11.5 to 12.1 )

This article maybe a repost, because i know this guide is from another source too, but at least, i try to help people from my experience to this article.

  1. Download ISO Software BIG-IP and HotFix version 12.0

download File ISO software BIG-IP and HotFix version 12.0 to local drive your computer from official website F5 https://support.f5.com/csp/article/K2200

  1. Backup Running Configuration

Backup running configuration from menu System –> Archive –> Created , and download that file to your local drive

  1. Import HotFix file to appliance BIG-IP

Upload Hotfix file version 12.1 from menu System –> Software Management –> Hotfix List And click Browse button to locate file ISO HotFix on your local drive computer , and choose file Hotfix from your local drive and click import button to upload that file to appliance

1

2

After progress import finish, we can see new list of Hotfix file version 12 on the column Available Image like on the picture below

3

4. Upload BIG-IP Software ISO to appliance

Upload File BIG-IP Software version 12.1 from menu System –> Software Management –> Image List , click browse to find location ISO BIG-IP software on local drive computer and click import to upload software to the appliance

4

Progress Upload will be shown like picture on the below

5

After progress upload success BIG-IP softwarewill be shown on Available Image column like the picture below

6

5. Install Software BIG-IP first to the appliance

Next, we will installed software BIG-IP first to the appliance from menu System –> Software Management –> Image List ,check the list BIG-IP software we will installed from Available Image , and then click install button, next choose partition drive will be appliance used to installed new software BIG-IP, choose the empty partition or please create new partition with format name like on the example picture below, and click install to install software

7

Please wait progress installation, and don’t leave page progress installation till Done

6. Install HotFix file to patching the new software wejust installed to the appliance BIG-IP

Next we will installed HotFix file, this file is the patching software to fix the vulnerability and bug BIG-IP software on version 12.1, install HotFix from menu System –> Software Management –> Hotfix List , check the new list hotfix on available file column and click install button to install the hotfix, next step we will choose partition where file hotfix will be installed and we will choose partition where we have installed BIG-IP software before, on this case we already installed BIG-IP software before on partition HD1.2, so we will choose partition 2, as partition where hotfix file will be installed with purpose to patching the BIG-IP software to latest patches bug fixing and closed the vulnerability security.

8

Installation progress page will be shown and don’t leave that page till installation progress done

7. Configuration Boot Location

After installation progress done, next we will configure boot location to activate new BIG-IP software version 12.1 we have installed as active boot of the system, from menu System –> Software Management –> Boot Location, choose the partition we already created and installed the new BIG-IP software (12.1), click the partition like on the picture below

9

Next after click the partition, we will see information enhancement software version for example 11.5 to 12.1 and enhancement hotfix software version too like on the picture below

10

On the option Install Configuration we can choose are the configuration running on the old software for example 11.5 will be installed on the new software??, if we choose “yes” on the below intall configuration option will be shown “source volume” or where the partition of the configuration file will be imported to the new software as active boot, in this case we will choose partition where the old BIG-IP software (11.5) installed like on the picture below

11

Because that configuration is running on the partition where old BIG-IP software installed (HD1.1)

To activate new software as active boot on the system click button activate and the appliance will be restared and choose new software as active boot

Note : when appliance BIG-IP up with new software version, backup configuration we have created before on the old BIG-IP software will be missing, because new boot is from new partition so I suggest you better download backup configuration on the appliance to your local drive computer

Note : Restore Config

To do restore configuration procedure to different chassis on the case like RMA, I have explanation like on the picture below

12

Good Luck!!