
Hi , on this article i will explore about traffic analysis and flow collector, this is so important i think because on this cultulre of technology right now, visibility of your traffic network its very important, because from that visibility we can analysis performance of your network and status flow of your application, with SNMP we can know how performance throughput from each interface network device on your network infrastructure, with flow collector we will know what exactly flow packet traverse through of our network interface device .
one of flow collector free to capture flow packet on your network infrastructure is “ntop/ntopng” this application can capture flow packet on your network device used two industry standard for flow-based traffic Monitoring “NetFlow” by Cisco and ” Open standard “sFlow”, thats what i know. okay without too much explanation where you can visit their website by yourself lets we installed ntop/ntopng on my linux server and try to capture flow packet from cisco network device for example
a. Install ntopng
Requirement :
- I used Ubuntu 14.04 64 Bit
- RAM 2 Gb
- 1 Core (VM)
- Disk 30Gb
Step to installation :
- Get repository ntop debian package
#wget http://packages.ntop.org/apt-stable/14.04/all/apt-ntop-stable.deb
2. install debian repository to ubuntu system
#dpkg -i apt-ntop-stable.deb
3. Do clean installation
#apt-get clean all
4. do update repository to get any dependency ntop-ng package installation
#apt-get update
5. Install package ntopng with command
#apt-get -y install pfring nprobe ntopng ntopng-data n2disk nbox
After Installation :
1. After installation done create configuration ntopng with command
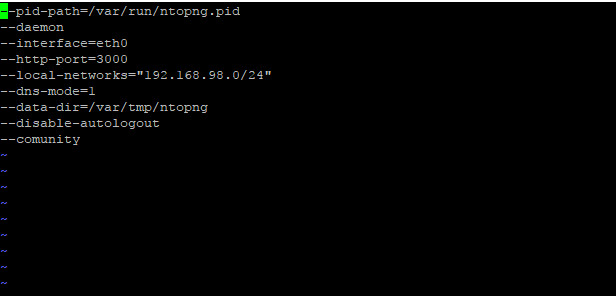
#vim /etc/ntopng/ntopng.conf
2. And write line configuration like on the example below, then save
3. Create empty file to auto start NTOP :
# touch /etc/ntopng/ntopng.start
# ntopng start
4. Start service ntop-ng services with command :
# service ntopng start
5. Check status service (Ntop used Port 3000)

6. Access with web browser to IP address server ntop used port 3000
http://<IP Ntopng>:3000
7. login with default user and password
user : admin
pass: admin
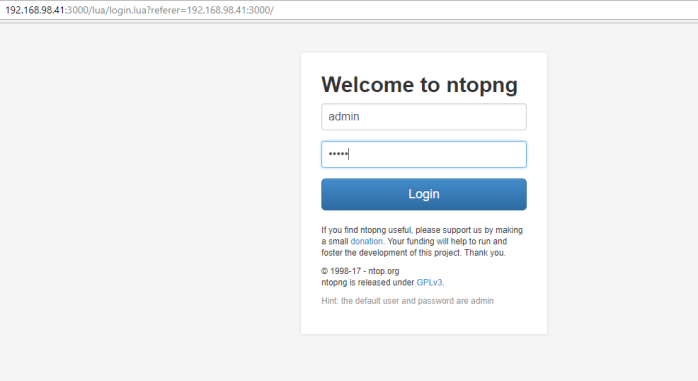
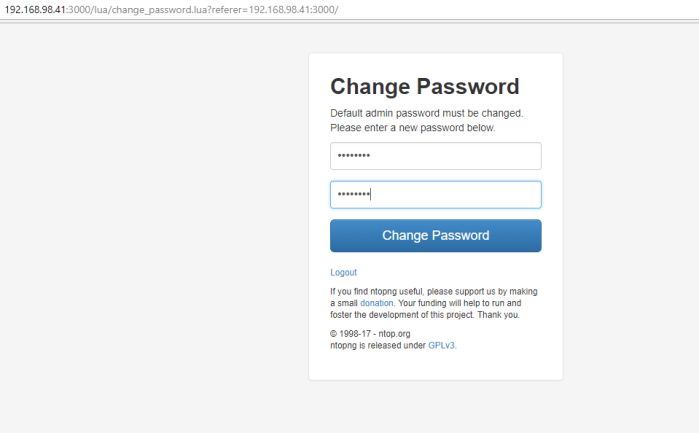
change the default password
and the picture below is dashboard admin page ntopng flow collector
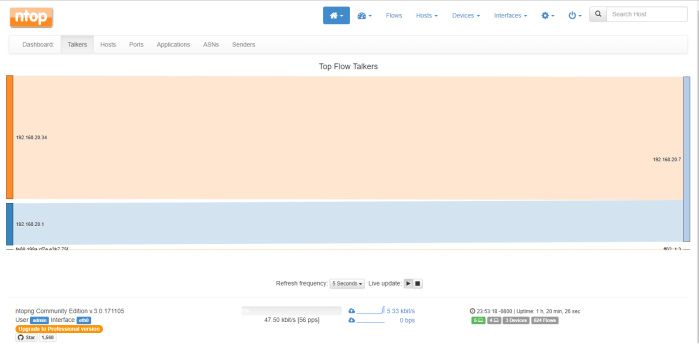
At the first time we already can see flow traffic on local network, its that segment local network ntopng server in this example network segment ntopng flow collector is 192.168.20.0/24 IP address ntop-ng server is 192.168.20.7 with gateway is 192.168.20.1
If we are want to see active flow on all address (local and remote) you can choose menu bar Flows, like example picture below
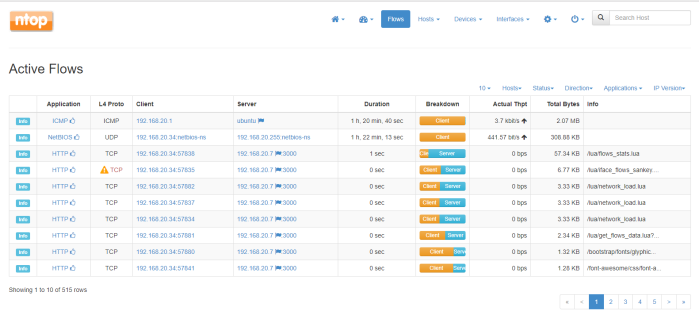
on example picture above ntopng can see local network flow packet, the mostly is http packet to port 3000, its that packet flow from my computer to access ntopng with protocol http used port 3000, next i will create simple network topology there is a one sample server attached to router device, on that scenario i will capture flow packet through interface router direct attached to the server and see on ntopng, flow packet ingress and egress to that server through router interface
example topology :
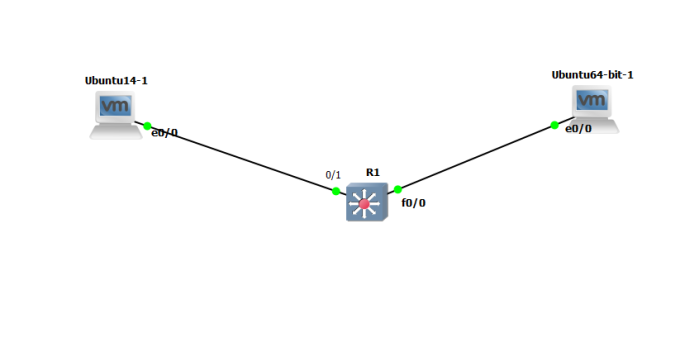
on this lab, i used GNS3 network simulator integrate to my vmware workstation and used one cisco router with l2 capability, on this scenario ID ubuntu64-bit-1 is the host running ntopng flow collector, host Ubuntu14-1 is the sample server running some service and as target server we will monitor using ntopng, target server network segment is 192.168.1.0/24, IP Target server is 192.168.1.10. R1 is network device router that will activate Netflow on the interface attached to target server and send the flow capture to ntopng.
1. Configure and activate Netflow protocol on cisco router to interface direct attached to target server
===========================================================
config#ip flow-cache timeout active 1
config#ip flow-export source FastEthernet0/1<Interface you want to eneble capture>
config#ip flow-export version 9
config#ip flow-export <destination your-ntopng ip-address> 2055
configure On the interface you want enable flow capturing so as to send it to ntopng. This example illustrate using fastEthernet0/1
config# interface FastEthernet0/1
config-if# ip flow ingress
config-if# ip flow egress
=======================================================
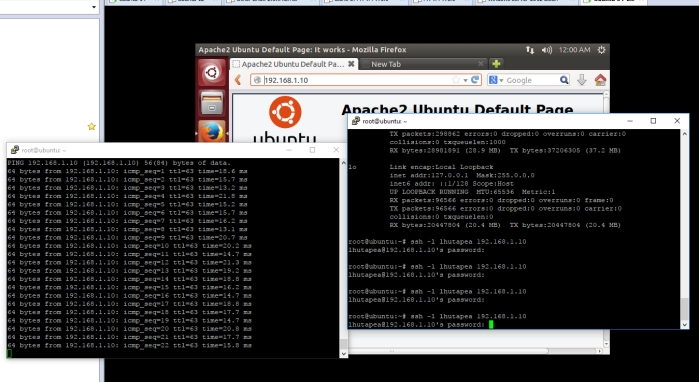
next we will test send some packet to server target (ubuntu14-1) to capture flow packet to that server and get the visibility on ntop-ng, we will send packet flow from ntop-ng server Ubuntu64 to target server Ubuntu14 used three type connection : ICMP, SSH, and HTTP
Then we back to window ntop-ng and choose menu hosts to see IP address of target server is have flow connection or not, and like on the picture below ntop-ng was discover IP target server 192.168.1.10 is already have 3 flow connection,
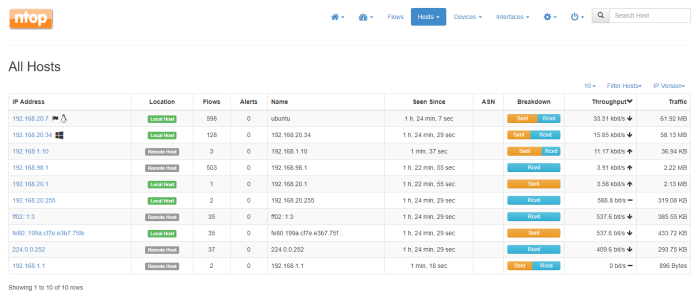
to see detailed flow connection click the IP address of target server “192.168.1.10”

If we choose manu bar Traffic, we can see live flow traffic protocol to the target server , like on the picture below target server accept connection ICMP and TCP

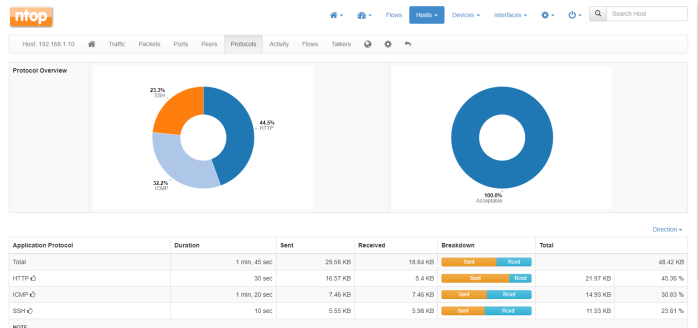
If we want to know presentage protocol flow on target server we can choose menu Protocols
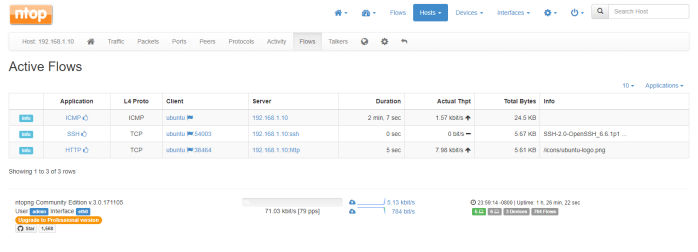
If we want to know detail flow of packet to target server we can choose menu “Flows”
Thats all a little information i can share to you, hope this article usefull and thank you for Visit my Blog
